Unity Session Replay
A stack trace tells you what broke. A screenshot tells you what it looked like. Neither tells you what the player was doing in the five seconds before the crash.
Session Replay adds that layer. It captures video from inside your Unity build, ships it with the snapshot, and plays it in the web console with logs, warnings, errors, and commands locked to the same timeline. QA can attach a repro without writing code; developers can still drive recording from gameplay or tests when they need to.
The three modes at a glance
Session Replay shares one capture pipeline across modes. They differ in when recording starts and what gets uploaded.
| Mode | When it records | Reach for it when |
|---|---|---|
| Manual Mode | Only while recording is active (UI or API) | You want short, deliberate clips around a known repro step |
| Autostart Mode | From the moment the snapshot session opens | You want the full run covered without asking QA to press record |
| Shadow Mode | Continuously to a rolling buffer; only committed parts upload | The bug was intermittent — you commit the last window after it happens |
Use Manual Mode for targeted captures. Use Autostart Mode for routine QA passes. Use Shadow Mode when you cannot predict timing and only want certain slices persisted.
Recording from the UI
Most sessions use the floating Jahro launch button in the build: tap it to open the in-game console and use the Replay controls without touching code. That matches how QA works — one tap to start context, another to stop — and it keeps ship blockers moving when nobody has a scripted repro yet.
Starting and stopping from the launch button

The floating Jahro launch button with the Replay record control highlighted. Tap to start a recording; tap again to stop and attach the video to the current snapshot.
- Ensure a snapshot session is active — Jahro opens one automatically when the game starts in typical setups.
- Tap the record control on the launch button.
- Play through the repro or exploration you care about.
- Tap the control again to stop. The current video part is attached to the snapshot and queued for upload with the rest of the session.
In Manual Mode, that flow starts and stops the recording explicitly. In Autostart Mode, recording has already started with the session; the same control acts as a stop for the current part so testers can close out a slice when they are done.
Committing Shadow Mode from the launch button
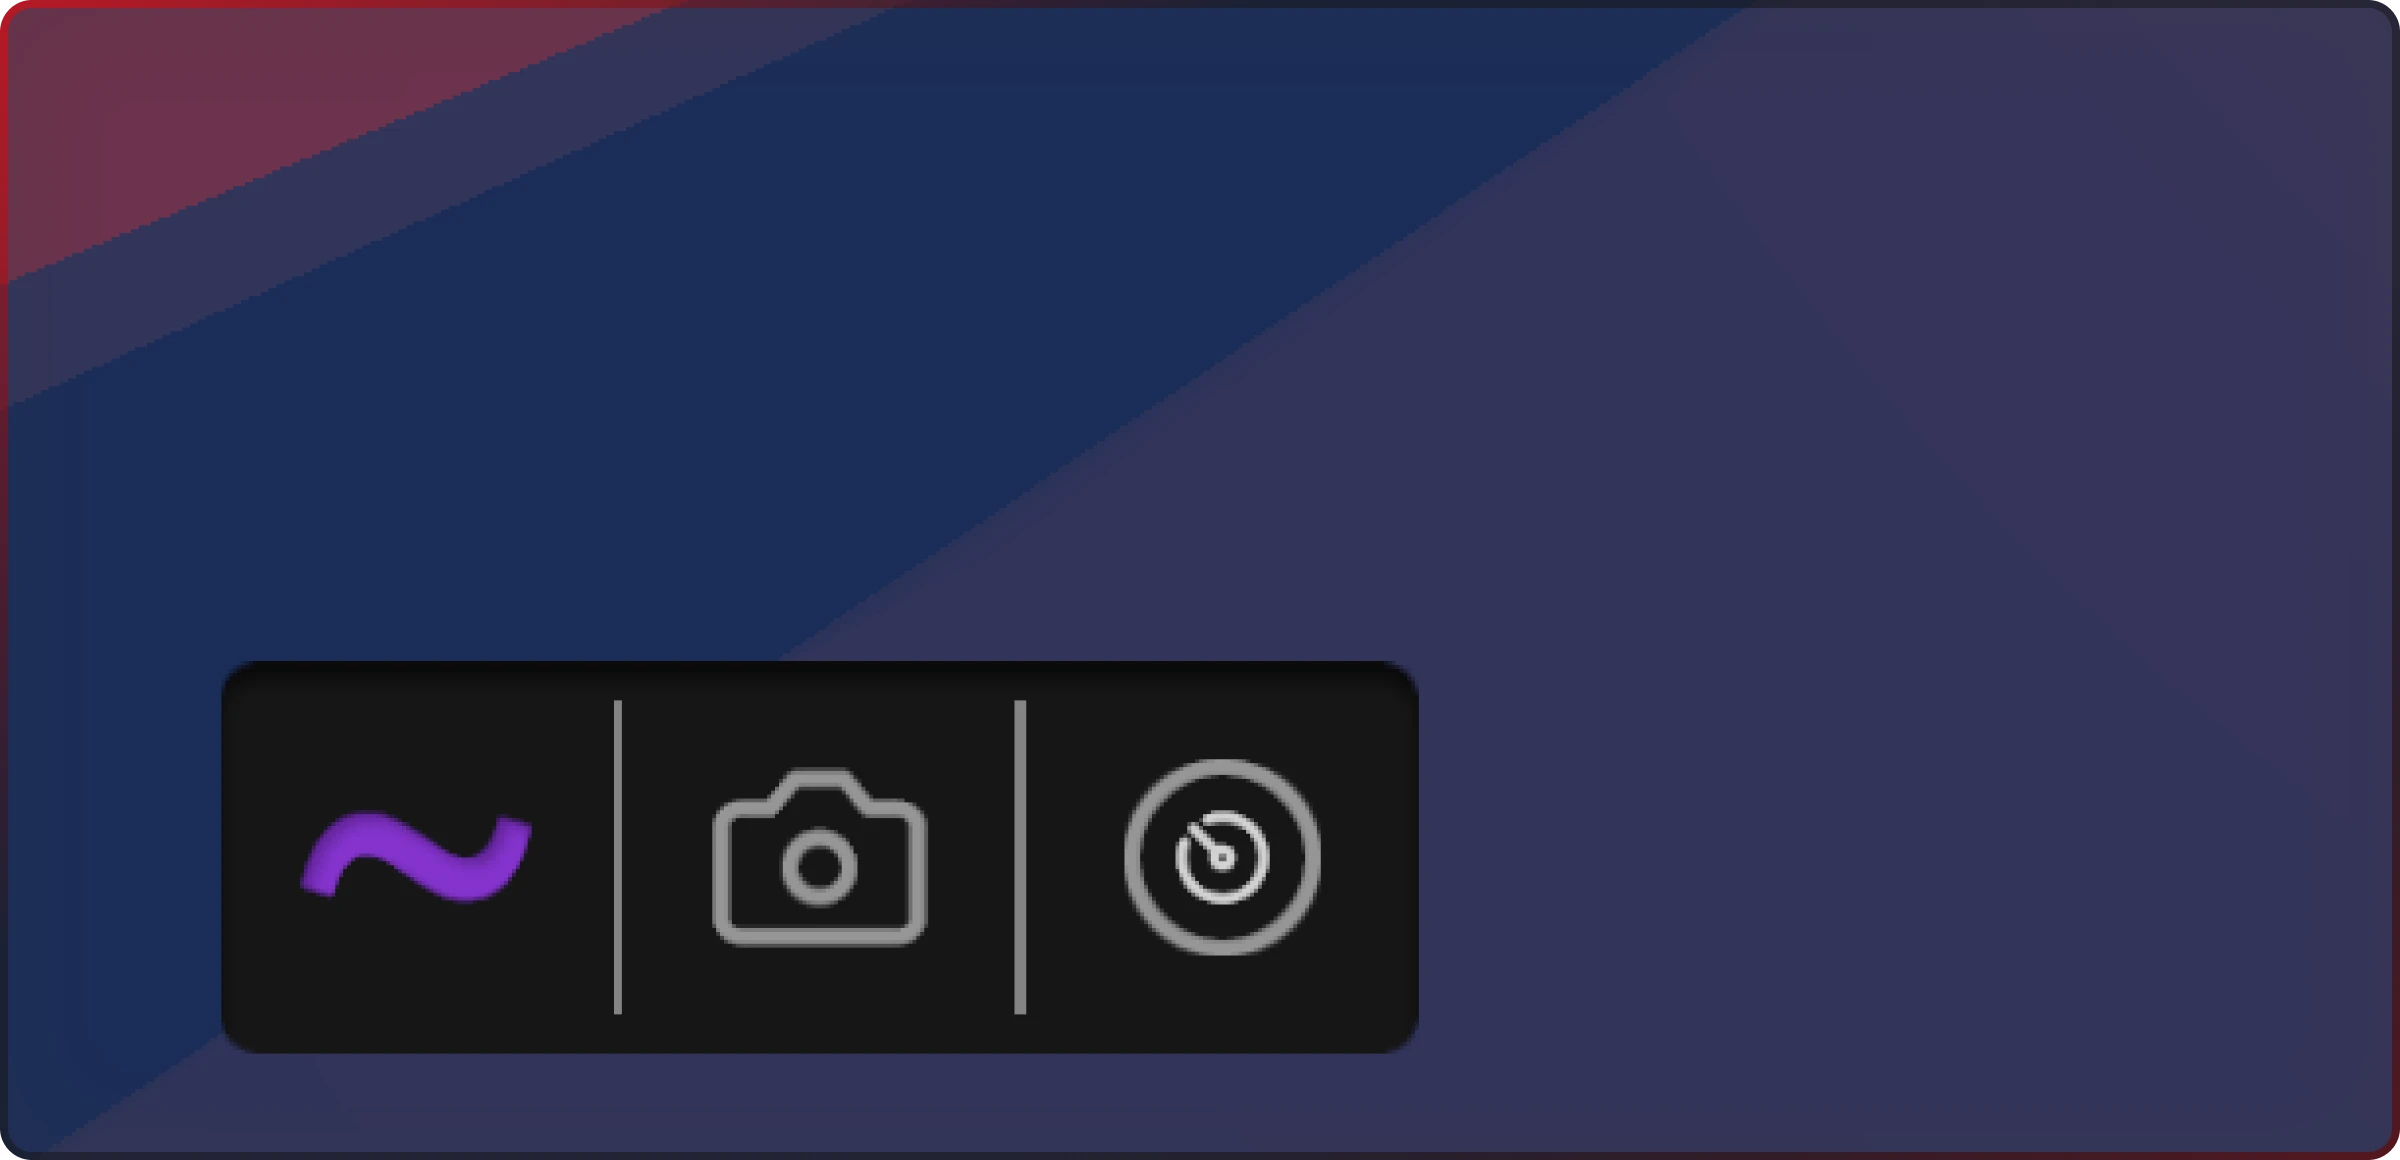
In Shadow Mode the launch button carries a commit control. Tap it the moment something unexpected happens — by default the previous 120 seconds (configurable) are saved as a new video part.
Shadow Mode is always capturing into a rolling buffer on device. Nothing is persisted until you commit; uncommitted frames are discarded when you end the session. When you commit, the last N seconds of the buffer become a new video part on the current snapshot, and the buffer keeps rolling. Expired frames older than the shadow window are cleaned up asynchronously every 30 frames.
Choosing the mode (in-game Settings View)
Recording mode — Manual Mode, Autostart Mode, or Shadow Mode — is selected in the in-app Jahro console’s Settings View (open the console from the launch button, then Settings). The choice applies after you restart the app.
Frame rate, resolution (maxResolutionSize), JPEG quality, and other video quality parameters are not developer-editable in the Unity editor or in local code for this release; they are delivered from backend configuration. The JahroSettings asset in the Unity editor covers package setup (for example enable/disable and hotkeys), not per-build video tuning — see Jahro Settings.
If you need a screenshot of the mode selector for your internal runbooks, capture it from the in-game Settings View on device; do not rely on the Unity Tools → Jahro Settings window for Replay mode.
Recording from code (secondary path)
Use the API when recording should follow gameplay, level loads, automated tests, or a custom debug HUD — not for the first-time “see it in the dashboard” path above.
Manual Mode
If you need to drive recording from your own code — for example tied to a gameplay trigger — use:
using Jahro;

public class BugRepro : MonoBehaviour
{
    public void ReproduceCrash()
    {
        Jahro.StartVideoRecording();

        // Run the exact steps that trigger the bug
        TriggerTheCrash();

        Jahro.StopVideoRecording();
    }
}
Autostart Mode
Autostart Mode is configuration-only: enable it in the in-game Settings View as described above. Jahro calls StartVideoRecording() when the snapshot session context is ready. No code is required for the default automatic start.
Shadow Mode
Most QA testers commit Shadow Mode from the launch button (previous section). The pattern below is useful when you want a keyboard shortcut during playtests or a button in a debug menu:
void Update()
{
    if (Input.GetKeyDown(KeyCode.F9))
    {
        // "That just happened — save the last 2 minutes."
        Jahro.CommitShadowRecording();
    }
}
Public API reference
Everything below lives on the Jahro static class.
// Control
Jahro.StartVideoRecording();
Jahro.StopVideoRecording();
Jahro.CommitShadowRecording();

// State
Jahro.VideoState            // JahroVideoState
Jahro.IsVideoRecording
Jahro.IsShadowRecording

// Events
Jahro.OnVideoStateChanged   // Action<JahroVideoState>
React to state transitions — for example, to show a “recording” indicator in your own HUD:
void OnEnable()
{
    Jahro.OnVideoStateChanged += HandleVideoState;
}

void HandleVideoState(JahroVideoState state)
{
    recordingDot.SetActive(state == JahroVideoState.Recording
                        || state == JahroVideoState.Shadow);
}
You can still call StartVideoRecording, StopVideoRecording, and CommitShadowRecording explicitly regardless of the selected mode; the mode controls automatic starts and Shadow buffering. Settings assets use symbols such as replayMode and ReplayMode.Autostart — choose the active mode in the in-game Settings View, not by editing the Unity editor window.
Recorder state machine
State transitions fire through Jahro.OnVideoStateChanged.
| State | What it means |
|---|---|
Idle | Nothing recording. Ready to go. |
Recording | Active capture (Manual or Autostart). |
Stopping | Flushing the write queue and finalizing the part directory. |
Shadow | Rolling buffer running; no permanent part output yet. |
Committing | Shadow buffer being moved to a permanent video part. |
Error | Terminal error — disk full, frame capture failure, etc. |
Error handling
Subscribe to OnVideoStateChanged and handle JahroVideoState.Error. Disk space is checked once before recording starts and every 50 frames thereafter.
| Error | Fires when |
|---|---|
InsufficientDiskSpace | Available disk drops below maxVideoSizeMB at start or during recording |
MaxDurationReached | Cumulative committed duration hits maxRecordingsDurationSec (900 seconds / 15 minutes) |
StorageLimitReached | Cumulative bytes written hit maxVideoSizeMB |
FrameCaptureFailure | Ten or more consecutive GPU readback failures on the async path, or unrecoverable init failure |
Unknown | Catch-all for unexpected conditions |
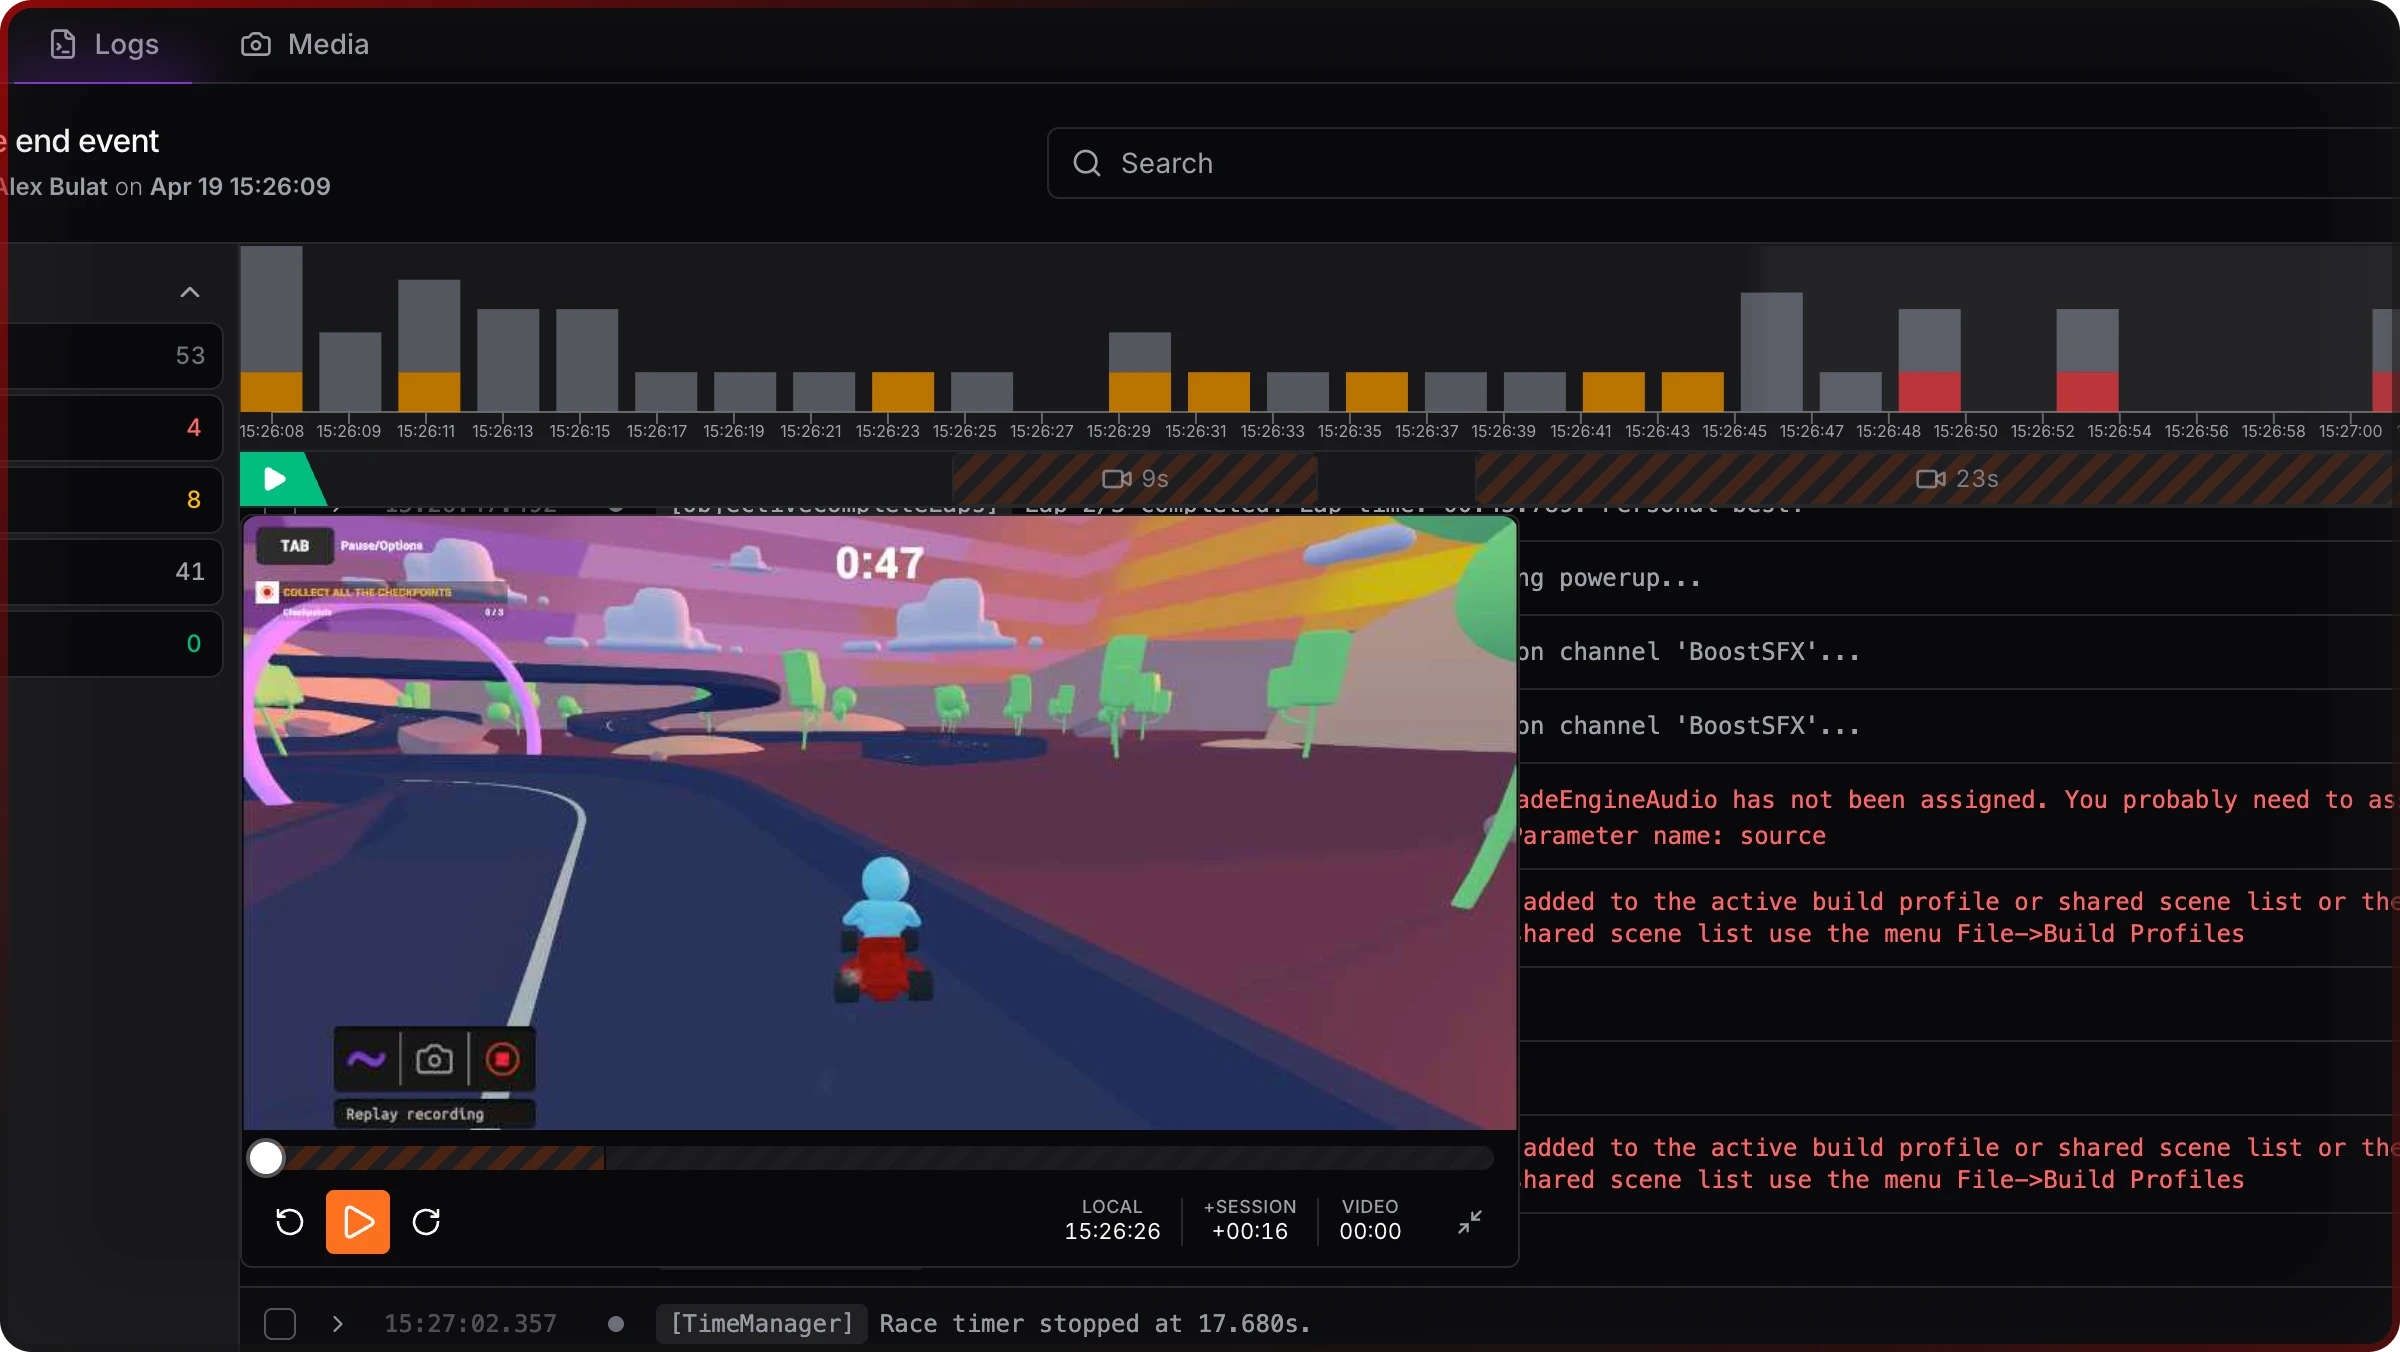
What you get in the dashboard
After upload, each video part is assembled server-side (FFmpeg, H.264, CRF 18, faststart) and appears in the snapshot. The screenshot below is the logs view (timeline + logs). Session Replay also appears on the snapshot overview beside screenshots; the Media tab lists combined replay and fragments.
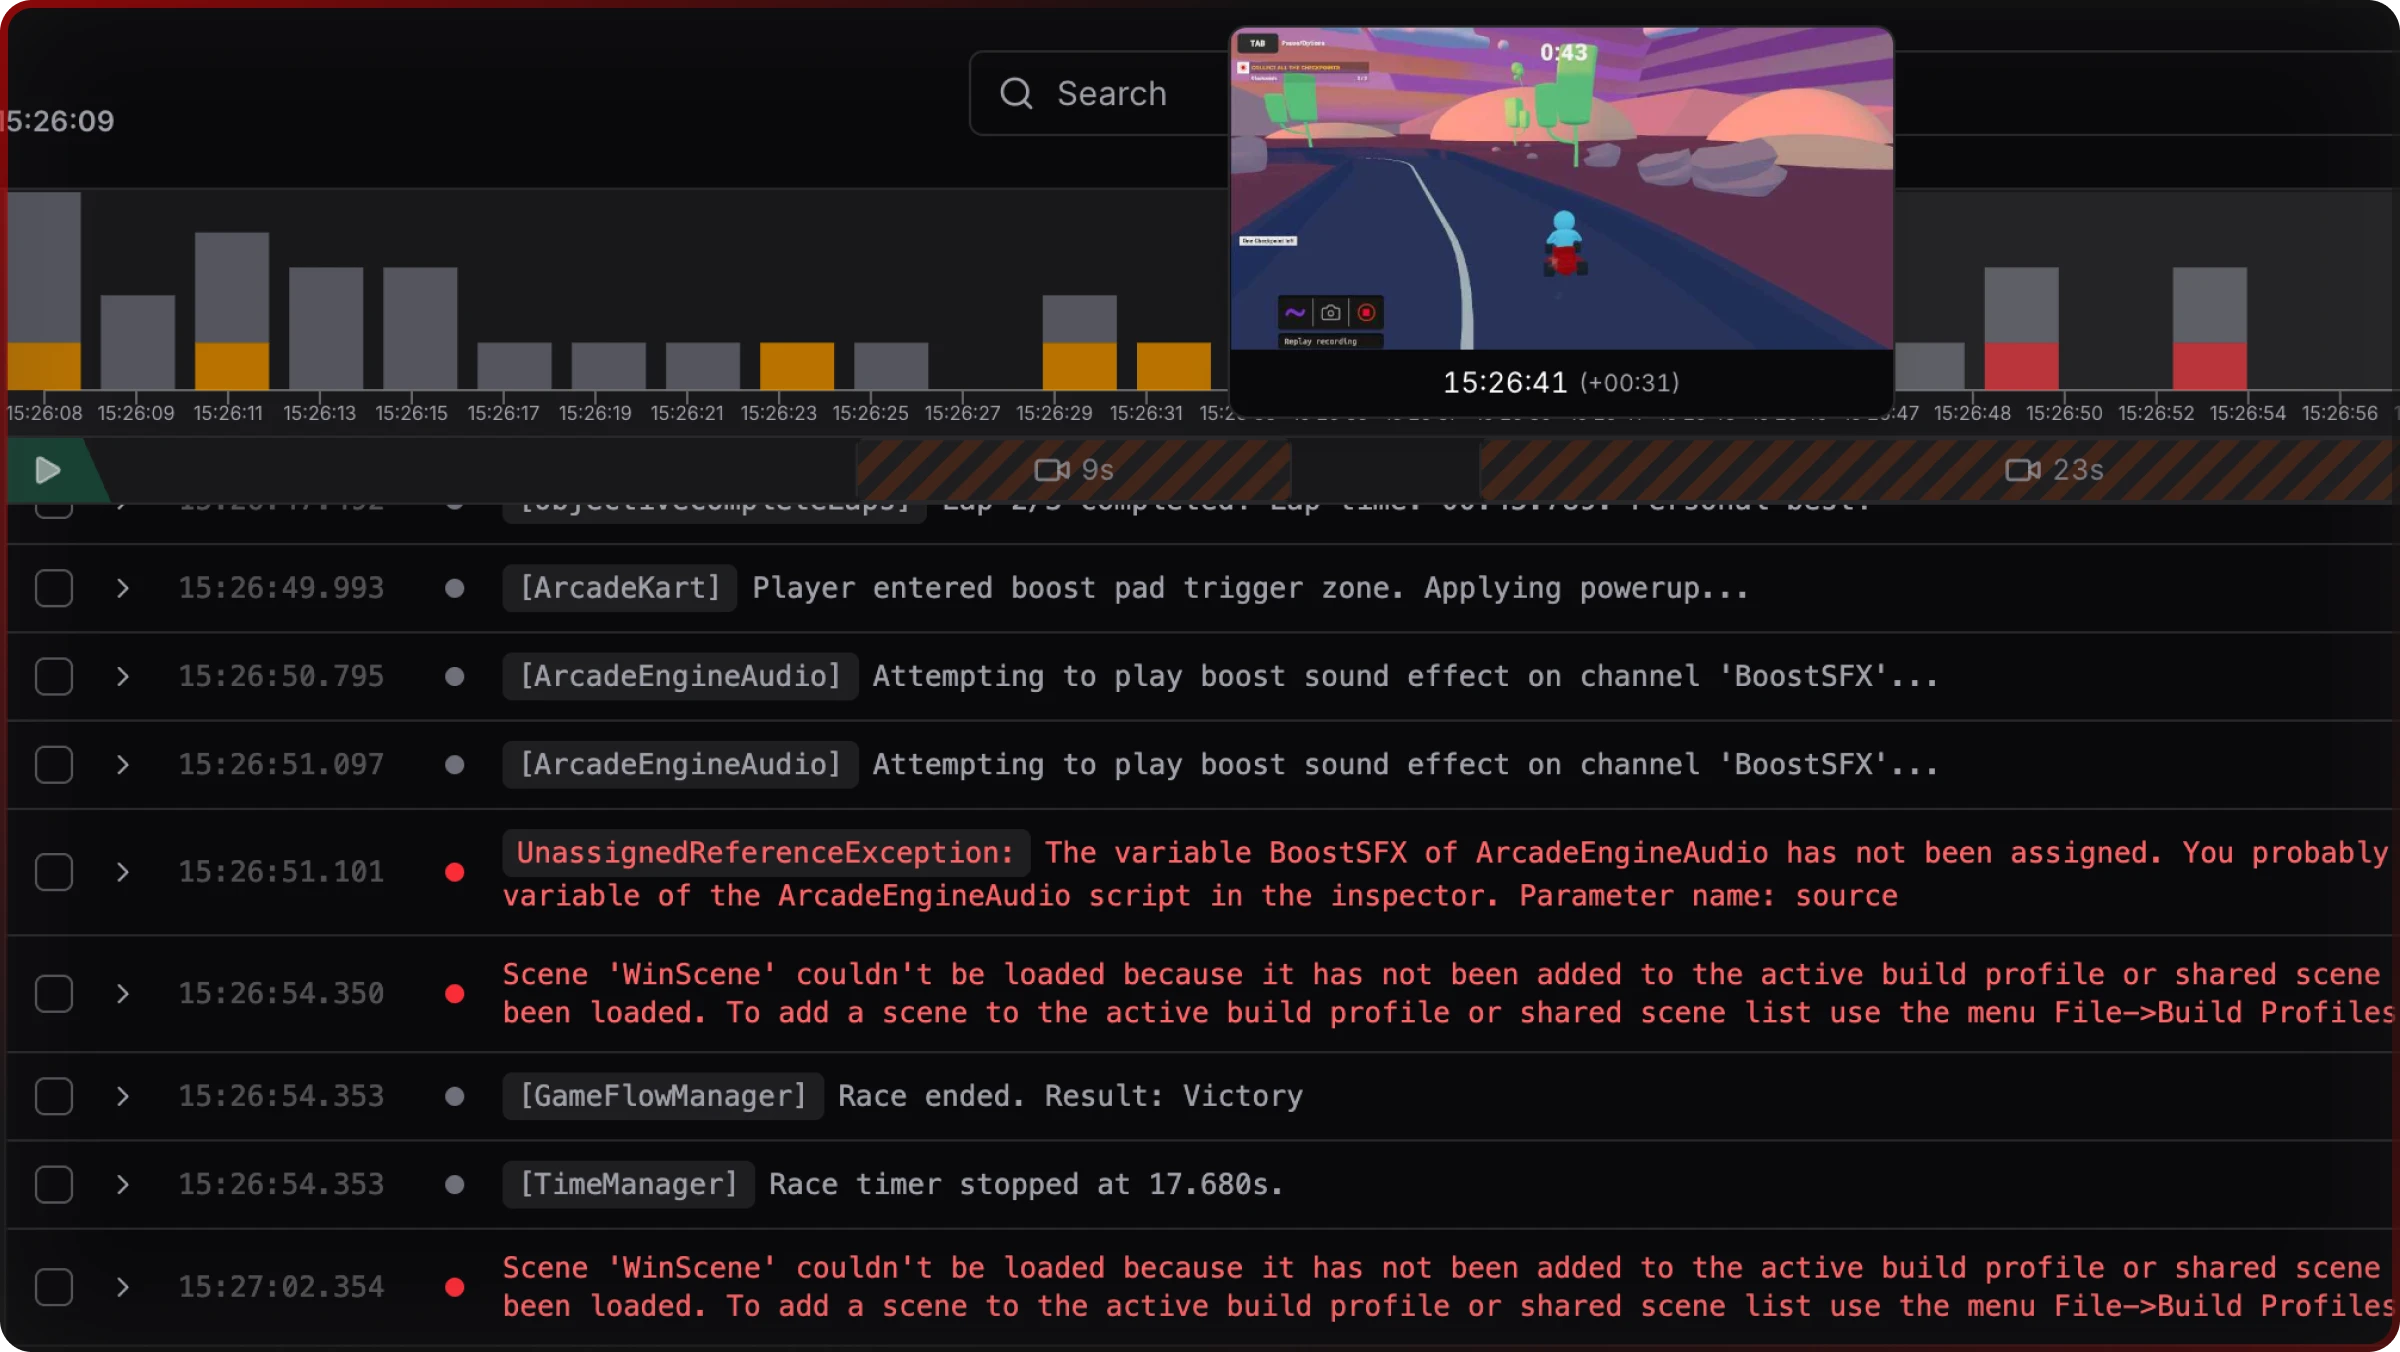
Logs view: Video Timeline under the event histogram, hover preview of the frame at the cursor, and the log table underneath — the usual place to correlate gameplay with errors.
In the logs view you get:
- Video timeline strip above the log table, aligned to session wall-clock time
- Hover preview for the frame at the cursor — no need to play through blindly
- Multi-part playback that stitches parts into one timeline (for example multiple Manual segments or Shadow commits)
- Log ↔ video sync — click a row to jump the player; scrub the player to follow logs
- Three time readouts:
LOCAL(wall clock),+SESSION(elapsed since session start),VIDEO(position in recorded footage) - Keyboard shortcuts:
Space/Kplay/pause,←/→jump 10s,Home/Endjump to ends,Escapecloses the floating player
Full UI reference: Session Replay in the web console.
Known limitations
Read this before you turn Session Replay on in production builds.
- 15-minute cap on committed footage per snapshot session. The limit applies to cumulative committed duration (
maxRecordingsDurationSec— 900 seconds). Shadow Mode’s rolling buffer does not count toward that total; only parts that upload do. When 15 minutes of committed recording has accumulated in a session, recording stops — start a new snapshot session (relaunch) to record more. There is no automatic split into a new part at the cap; Manual and Autostart hitMaxDurationReachedand stop. - No audio. Capture is a silent JPEG sequence. Record audio elsewhere if you need it.
- 5 fps default, 860 px longest side, JPEG quality 50. Tuned for low overhead; exact parameters are backend-controlled, not per-developer fields in the editor.
- JPEG compression can soften fine text or particles — that is a trade-off of the default quality setting.
- Android Emulator uses a synchronous
Texture2D.ReadPixelsfallback (detected via GPU names containing Emulator / Translator / SwiftShader). Real devices use the async path. - Single active session. Only one snapshot session — hence one recording pipeline — at a time.
- Local snapshot cap of 10 — oldest snapshots are evicted automatically when the cap is exceeded.
- Disabled SDK —
StartVideoRecording()and related calls are no-ops whenJahro.Enabledis false (for example release builds with Jahro stripped).
Frequently asked questions
What is Session Replay in Jahro?
Session Replay is Jahro's in-engine video capture. It records your Unity build as a lightweight JPEG frame sequence, uploads it with the snapshot, and assembles it into a streamable MP4 in the cloud. Replay plays back in the web console synchronized to every log, warning, error, and command from the session.
Which recording modes are available?
Three modes. Manual Mode starts and stops recording when you use the in-game control or call the API. Autostart Mode begins recording when the snapshot session opens. Shadow Mode keeps a rolling buffer; only committed parts upload. Select the mode in the in-game Settings View (restart to apply).
How do I control Session Replay from code?
Use Jahro.StartVideoRecording(), Jahro.StopVideoRecording(), and Jahro.CommitShadowRecording(). State is on Jahro.VideoState; Jahro.OnVideoStateChanged fires on transitions. Diagnostics: VideoRecordingDuration, VideoTotalDuration, VideoFramesCaptured, VideoStorageUsedBytes, VideoPartIndex, VideoWriteQueueDepth.
Will Session Replay hurt my game's performance?
Defaults use 5 fps capture, 860 px on the longest side, JPEG quality 50, async GPU readback with up to three requests in flight, and background writes. Video quality is configured on the backend, not in local Unity settings. The Android Emulator uses a synchronous fallback.
What are the current Session Replay limitations?
No audio; Screen Space — Overlay UI is not captured; one snapshot session at a time; Emulator sync capture; APIs no-op when Jahro.Enabled is false. Committed recording per session is capped at 15 minutes with no auto-split — relaunch the session to record more. Shadow’s buffer does not count toward the cap until you commit.
Related docs
- Session Replay (overview) — Product page: positioning, workflows, and FAQs
- Snapshots — Session wrapper Replay attaches to
- Session Replay in the web console — Timeline, player, and controls
- Jahro Settings — Package configuration in the Unity editor
- Unity API Reference — Full Jahro API surface